Clearing 37” Tires on a Toyota Tundra at any ride height

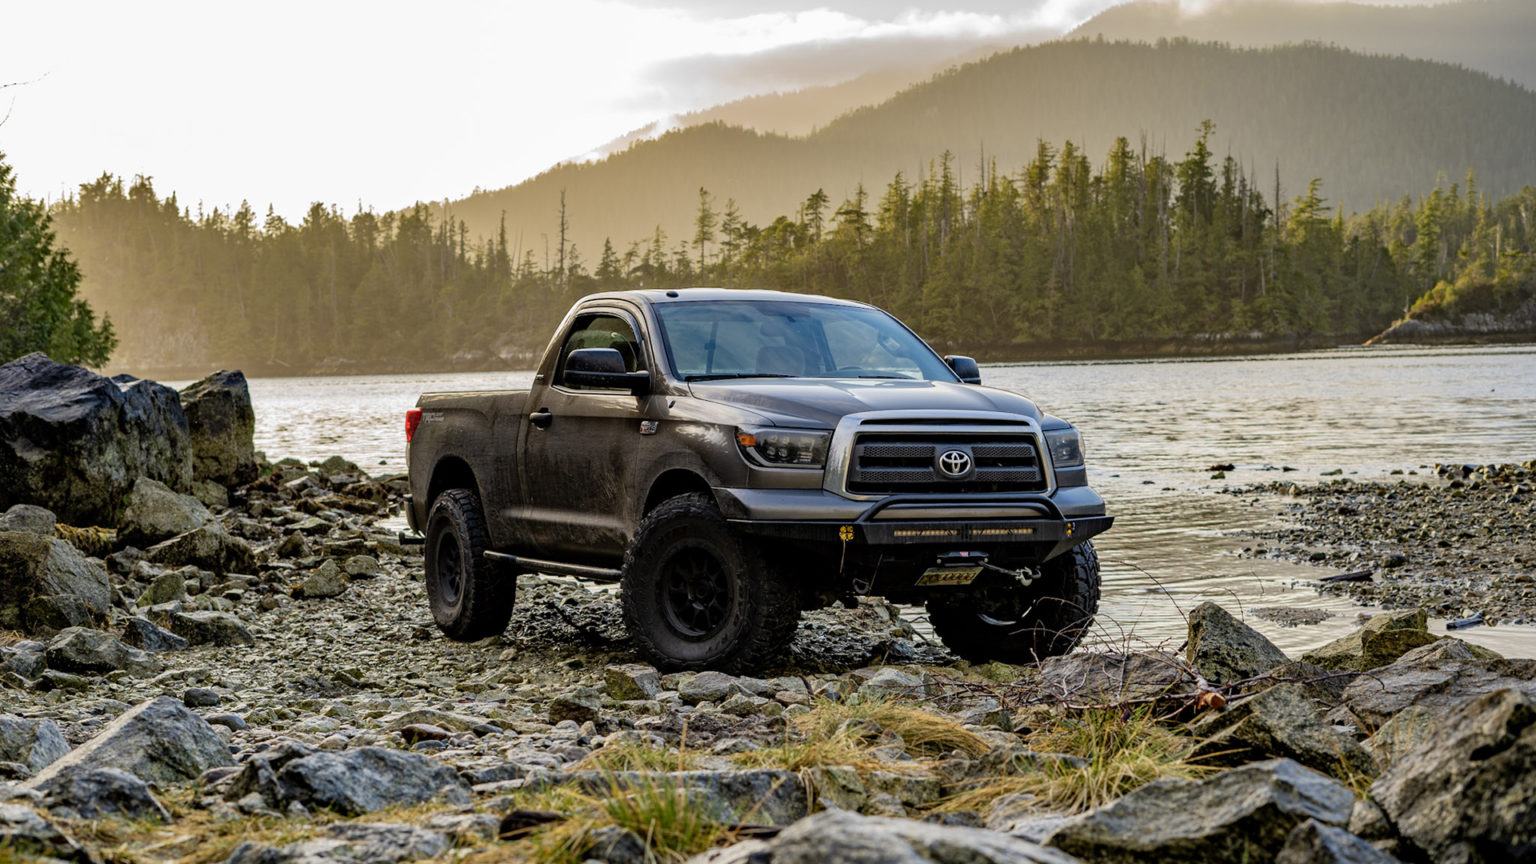
Several years back, I wrote an article on clearing 35” tires on a 3rd generation (1998) Toyota 4Runner. At that time, Toyotas running 35” tires without the use of a huge lift were relatively uncommon. However fast forward to today and the scene has progressed hugely, both in terms of the range of aftermarket parts available and how much cutting and permanent modifications the average enthusiast is willing to do. It’s now pretty common for 35” tires and a 2-3” lift to be the go-to build on 4Runners, Tacomas and GX’s. The next logical step is 37” tires. While I will be doing an article on clearing 37” tires on a GX470 (which will also apply to the 4Runner and Tacoma) later this year, today’s article is about how to clear 37” tires on the 2007-2021 Toyota Tundra.


The Tundra has never been quite as popular as the Tacoma and 4Runner when it comes to offroad builds. It makes sense, as the Tundra is a much bigger vehicle and its increased width in particular can become a hinderance on the trail. On the flipside, Tundra’s have much more storage space and payload weight capacity and as a result, they are becoming a more and more popular choice for overland builds that are more geared towards exploration and camping. And lets be real, its also sort of just the natural progression of the life of a Toyota truck owner: you own a Tacoma and then you sell it to buy a 4-door Tundra once the babies start arriving. So instead of talking about the usual Tacoma and 4Runner firewall and body mount mods (of which there are a million articles/videos out there), today we’ll be going through the details on clearing 37” tires on a Tundra at ANY ride height.

Clearing 37” Tires on a Toyota Tundra at any ride height

Let me start out by saying the 2007-2021 Tundra has far more space in the wheel wells to begin with when compared to a Tacoma or 4Runner. From my experience, I would go as far as to say that clearing 37” tires on a Tundra is actually easier than clearing 35” tires on a Tacoma/4Runner. However, there are some key details to keep in mind that make this possible. This how-to article will allow you to clear 37” tires at any ride height. This includes a bone stock Tundra with no lift at all! Now this may sound very counter-intuitive to you and I don’t blame you one bit for thinking that way. It’s commonly taught that lifts are how you fit larger tires on any vehicle. While that is true in some ways, lifts do not provide true tire clearance throughout the suspension travel range. For an in-depth explanation on this, please see our previously mentioned article where I dive into the mechanics of the suspension and show why a suspension lift will not actually help you clear those big tires.

There are two huge added bonuses that make is easier to clear 37” tires on the Tundra. First off, no cutting of the actual outer fenders is required to fit 37” tires. All of the clearancing work will be hidden inside the wheel wheels and out of sight. This takes a lot of the anxiety out of this job for those who are a little hesitant about cutting into their Tundra. Even if your work isn’t the prettiest, you can at least rest assured it will be out of sight! Unless someone sticks their head inside the wheel well, the truck will appear completely stock and unmodified. Secondly, a true firewall tub is NOT required. A firewall tub is where you cut a big hole into the interior of your vehicle and start trading leg room for tire room. On the Tundra, you only need to deal with the pinch weld seam and body mount. Your interior remains fully intact and this also makes this whole clearancing process much less intimidating.

Disclaimer: This article is simply an informational resource to give you an idea of what is required to tub a vehicle for oversized tires before deciding to attempt it yourself. Coastal Offroad nor myself are responsible for any problems you encounter while performing these modifications on your own vehicle.

WHAT YOU’LL NEED:

1. Floor Jack
2. Jack Stands
3. Wrench and socket set
4. Pipe wrench or adjustable wrench capable of expanding to 2.25” in size
5. Welder – MIG, TIG or Stick will work
6. Basic Welding Items – Welding mask, Heat resistant gloves, welding pliers
7. 4-5” angle grinder
8. Smaller die grinder (optional, though can provide easier access in tight areas)
9. Metal cutting disks (makes sure you don’t buy masonry disks by accident lol)
10. Flap disks
11. Masking tape
12. Sharpie marker
13. Polyurethane sealant
14. Primer
15. Rubberized undercoating or bedliner
16. Cab Mount Chop Plate Kit
17. Bumpstop Spacer Kit (Optional but recommended)
18. Front Bumper Shim Kit (Optional – see details for when this is required)

Choosing your Wheel and Tire Setup

Before embarking on these modifications, you will of course need to choose which 37” tires and wheel setup you will be running. The most important consideration is the wheel offset. Wheel offset is the distance between the wheel centerline and the hub mounting interface. This is what will determine how far outside the fenders your new tires will sit. The Tundra’s stock wheels are an 18×8” size with a +60mm offset. The lower the offset number, the further outwards your tires will sit. For example, a wheel with a +40 offset will sit 20mm further outboard than a wheel with a +60 offset. While wheels with a really low or even negative offset provide a certain look, they are not your friend when trying to clear 37” tires. The reason is this: when you turn your steering wheel, your front tires are not just pivoting on the spot. They actually move front to back in an arcing motion. When you move your tires outwards with wheel offset, your steering pivot points are still staying in their original location. This results in your front tires making a larger arc as they turn. This means that your tires will move through a larger range inside your wheel well and rub on a lot more stuff.

Now not to worry, you don’t need to keep a super narrow, stock-width stance in order for this clearancing procedure to work. However, I highly recommend choosing wheels with an offset that is between +15 and +25. This is the golden range and just keep in mind that if you decide to go lower than a +15 offset, expect to have to do a lot more cutting and modifications than shown here. Also keep in mind that if you go wider than a +15 offset, 37” tires many no longer clear your outer fenders when tucking during compression. Thus, you may need to cut and re-seal your outer fenders to fix this issue.  For reference, the truck shown in this article is running 17×8.5” wheels with a +15 offset (amount of “poke” shown below). While it doesn’t have the offset of a SEMA show truck (nor should you want that), the truck has a plenty-aggressive stance especially with the 12.5” wide tires. While on the topic of wheel offset, I will also point out that you absolutely can use wheel spacers with the factory wheels to get the same outcome. A wheel spacer that is 1.25-1.5” in thickness is perfect and will put you in that correct offset range. Maybe I’m just weird, but I have a bit of a soft spot for big tires on factory wheels and usually run that setup on my vehicles for a while before switching it up. Anyone who tells you that good quality, hubcentric wheel spacers are bad is likely just repeating what they heard from a fellow keyboard warrior.

Clearing 37” Tires on a Toyota Tundra at any ride height

The other consideration is your tire choice. Not every 37” tire is built the same and there is actually a huge amount of variance from tire brand to tire brand. The true height, width and profile all vary from one company’s 37” tire to the next and this can make a big difference when it comes time to clear those tires. Switching between an all terrain and a mud terrain also makes a difference. Mud terrains typically have a deeper tread and much larger side lugs, which make for a taller and more squared off tire profile. For this build, I went with the Toyo RT in a 37×12.5×17” size. Coincidentally, the tire shop I picked these up from is called RT Tire. If you are looking for tires in the Vancouver, BC area, I highly recommend checking them out as they really know their stuff and have the best service around. The Toyo’s used in this article are known to be one of the bigger and most squared off 37” tires on the market, but it is possible that some 37” mud terrains out there will run slightly larger than these and cause a little more rubbing. However, following these steps should be sufficient for just about all 37’s on the market.

As a side note, If you want to take the easiest possible route into the 37’s club, go with a BFG KO2 All terrain tire. They are known to be the most undersized tire on the market and will be the easiest to fit.

Front Bumper and Sway Bar

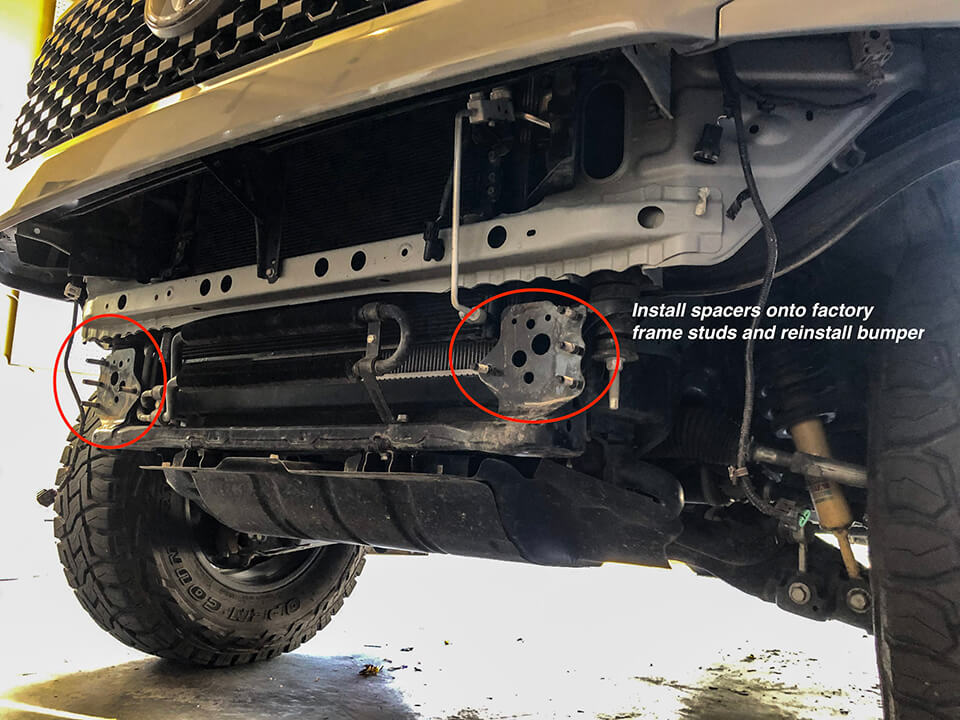
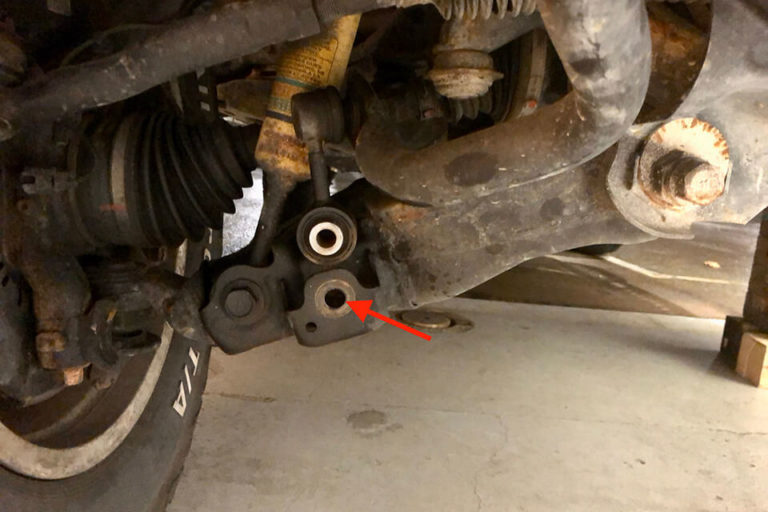
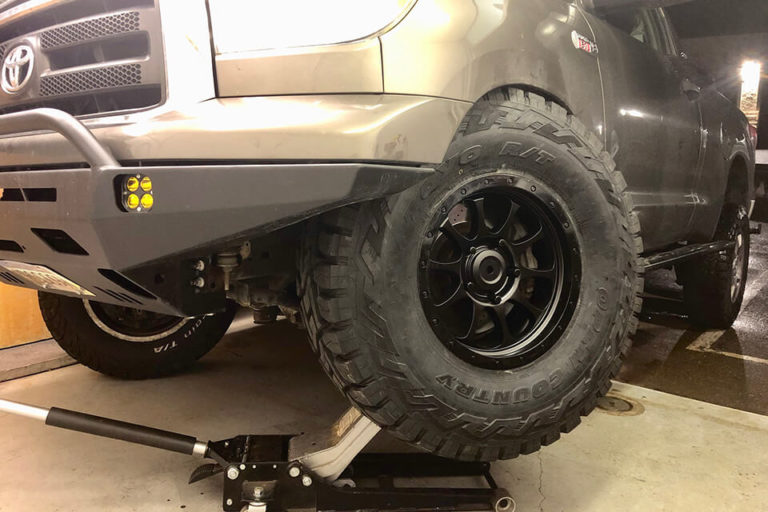
The truck pictured in this article is running a Coastal Offroad front bumper. This bumper is specifically designed to clear 37” tires at full compression and lock to lock steering so no clearancing work is required here. However, if you have the factory front bumper or an aftermarket bumper from a different manufacturer, you may need to trim it or add spacers to push it forwards. The first option is to trim about 1” off of the bumper and fender liner in the area closest to the wheel well to gain enough clearance for the tires. The second option is to simply install shim plates onto the frame end plates (as shown below) to push the bumper forwards. This is the easiest solution and again avoids the need to make visible cuts on the exterior of your vehicle. Those shim plates can be found here.

Clearing 37” Tires on a Toyota Tundra at any ride height

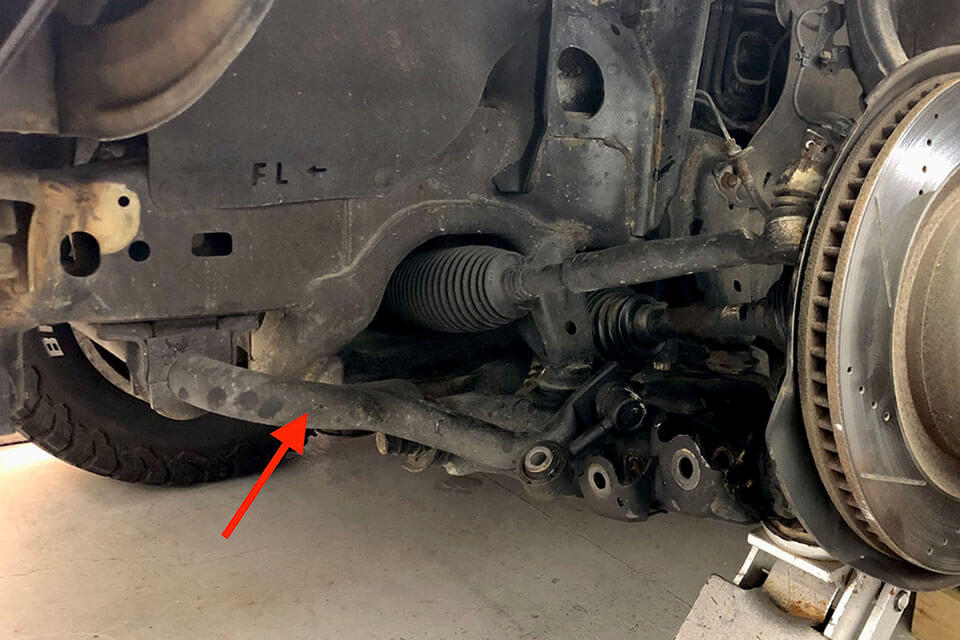
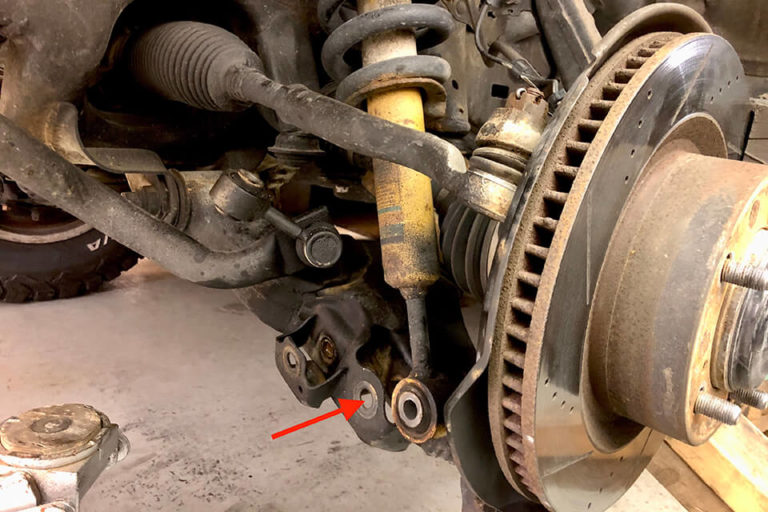
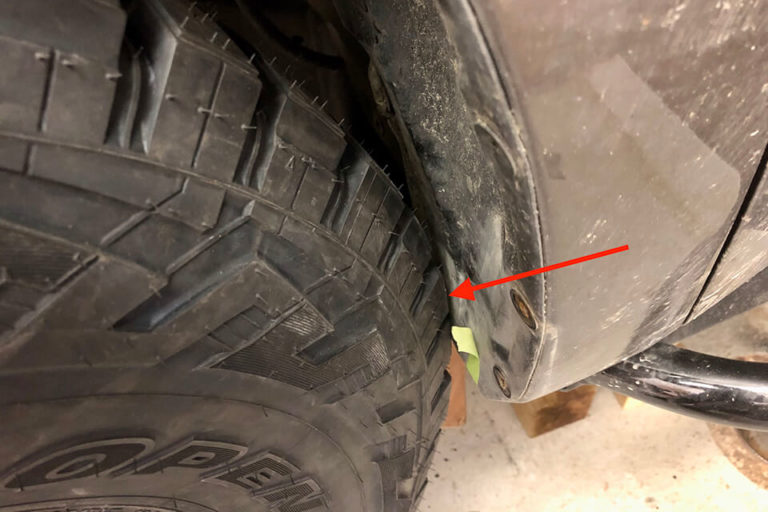
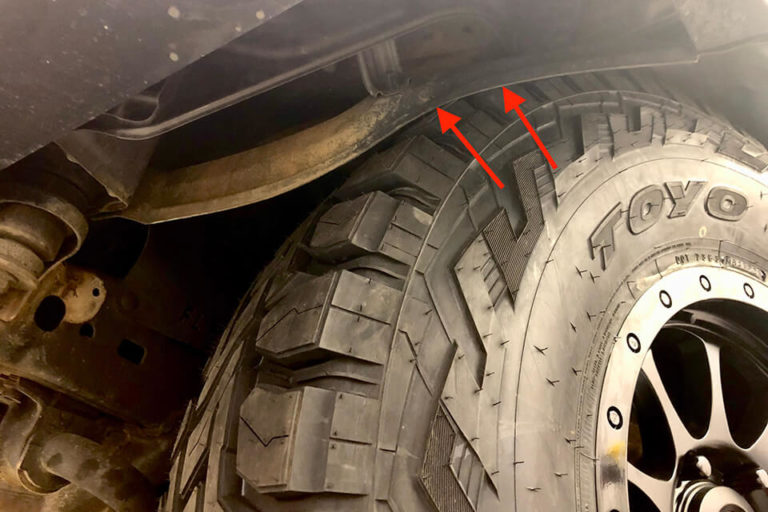
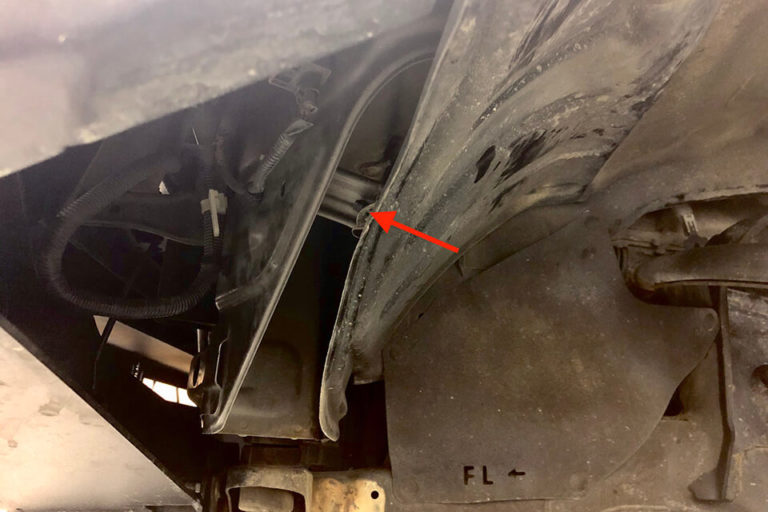
Now for the front sway bar. It seems to be the norm for Tundra owners to ditch their front sway bar whenever making the jump to 37” tires. Yes, 37’s will rub on the sway bar at full lock steering in the location indicated by the red arrow (pictured below). However, I found that this occurs so close to max lock steering that you really aren’t losing much turning radius at all by keeping the sway bar on. Yes, your tire will rub the paint off your sway bar but this is honestly the worst thing that will happen. The tire will touch the sway bar in a location where it’s a smooth, rounded bar so its not going to cut into your nice new 37’s or cause any other damage. So depending on your intended uses for your Tundra, keep the sway bar on or remove it. Either way will be just fine.

Clearing 37” Tires on a Toyota Tundra at any ride height

What about Using my Wheel Alignment Specs to Gain Extra Tire Clearance?

A commonly talked about method of gaining a little extra tire clearance around the body mount and firewall is to push the tires forwards using the factory alignment cams. This is done by maxing out the front alignment cams inwards and the rear alignment cams outwards. This tilts the lower control arms forwards and maximizes your caster angle. While this may buy you a little bit of extra tire clearance, there is debate on whether this causes excessive bushing wear and component damage over time. Since you are maxing out the front alignment cam in one direction and maxing out the rear cam in the opposite direction, your lower control arm will end up at a slight angle within its mounts which is never ideal. This method also requires the use of aftermarket adjustable upper control arms to get your camber angle back into spec. And depending on your area, it may be tough to find an alignment shop who is even willing to do this type of alignment for you. So in short, yes this method can give you a little bit of extra tire clearance around your body mount and firewall pinch weld, but it is not mandatory and I personally would avoid it. 

STARTING THE CLEARANCE PROCESS

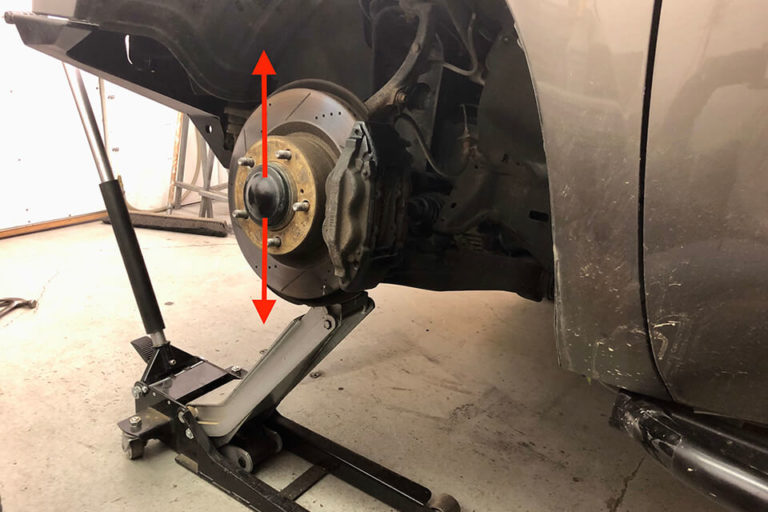
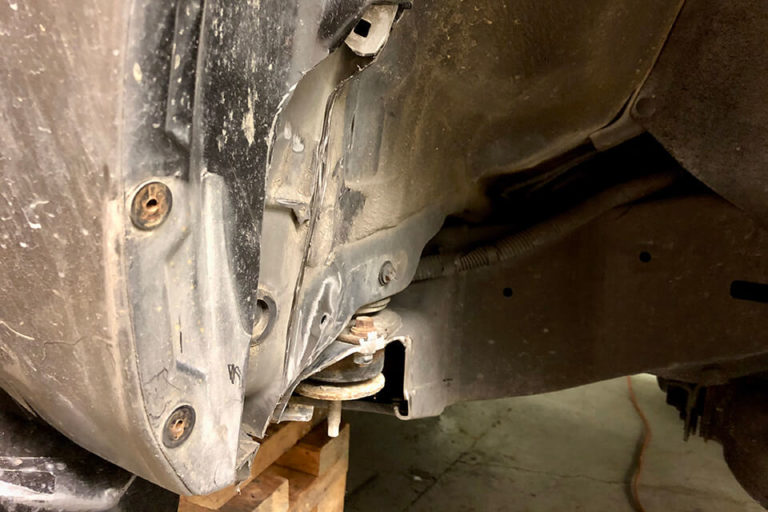
So you’ve chosen your wheels and tires, collected the required tools and supplies you’ll need, and read up on our previous article to better understand our goal of achieving no tire rub at full compression and lock to lock steering. It’s now time to start the process of clearancing your Tundra’s wheel wells.

1. Jack up the front end of your vehicle and support it on jack stands. Ensure that your jack stands are positioned so that your 37” tires have space to turn lock to lock without hitting the jack stands. Remove your front wheels.

Clearing 37” Tires on a Toyota Tundra at any ride height

2. Using a 19mm socket, remove the bolt attaching the sway bar end link to the lower control arm. Do this on both sides so that the sway bar is free to rotate up and out of the way of the lower control arm.

Using a 19mm socket, remove the bolt attaching the sway bar end link to the lower control arm. Do this on both sides so that the sway bar is free to rotate up and out of the way of the lower control arm.

3. Remove the strut assembly/coilover from the vehicle. Do so by first removing the bottom nut using a 19mm socket.  Next, remove the 3 top nuts using a 15mm socket. Space is really tight around the top nuts so I usually use a ratcheting box wrench. Finally, gently tap out the bottom shock bolt. It can help to apply some upwards or downwards pressure to the lower control arm to free the tension from this lower bolt so it slides out. Remove the strut assembly from the vehicle by sliding it out the bottom. It can sometimes be a bit tight to maneuver the strut assembly past the CV axle and tie rod but it will go. Jacking the lower control arm up a little can help create some extra space.

Using a 19mm socket, remove the bolt attaching the sway bar end link to the lower control arm. Do this on both sides so that the sway bar is free to rotate up and out of the way of the lower control arm.

4. You will also want to remove your front mudflaps. Do so using a 10mm socket.

Using a 19mm socket, remove the bolt attaching the sway bar end link to the lower control arm. Do this on both sides so that the sway bar is free to rotate up and out of the way of the lower control arm.

5. With the strut assembly removed from the vehicle, you can now place a floor jack underneath the lower control arm and freely jack it up and down without the force of the strut and coil assembly fighting against you. This is what is going to allow you to test your tire clearance with the suspension fully compressed to the bump stops. This is critical as it will mimic the real-world situation of the suspension bottoming out in its travel, which is when the tires will rub the worst. If your tires clear at full compression lock to lock steering using this method, you can be confident that your tires will never rub while on the road or trail (There is one small caveat to this, which I will cover later in this article).

Using a 19mm socket, remove the bolt attaching the sway bar end link to the lower control arm. Do this on both sides so that the sway bar is free to rotate up and out of the way of the lower control arm.

6. Let the floor jack back down and install the wheel and tire back onto the vehicle. Once installed, jack the lower control arm up again until the bumpstops bottom out, indicating full suspension compression. Turn the wheel left and right and take note of where the tire is rubbing.

Using a 19mm socket, remove the bolt attaching the sway bar end link to the lower control arm. Do this on both sides so that the sway bar is free to rotate up and out of the way of the lower control arm.

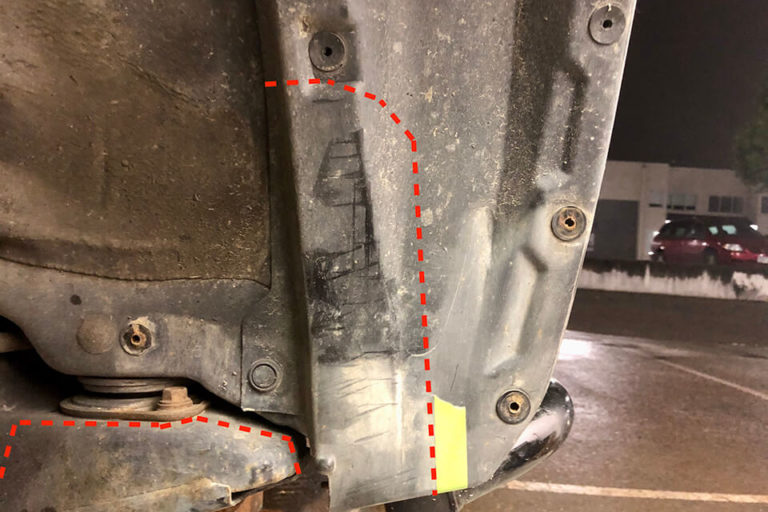
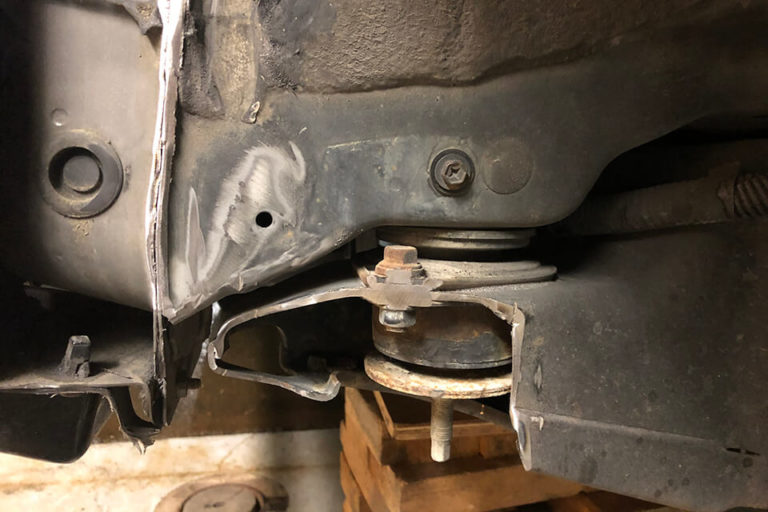
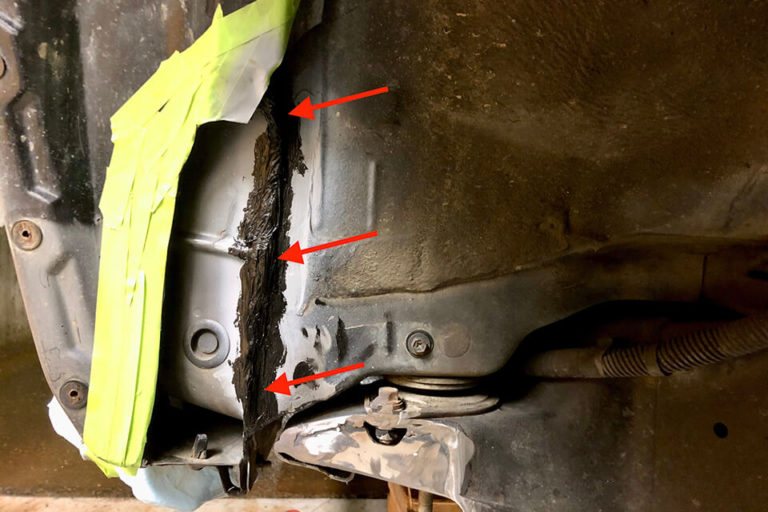
7. Upon doing this, you will quickly realize that the worst area for rubbing is at the back of the wheel well where the firewall and body mount are located. From here, the clearancing will become an iterative process of removing the wheel and tire, doing a little trimming, re-installing the tire, rechecking the clearance and repeating.

Using a 19mm socket, remove the bolt attaching the sway bar end link to the lower control arm. Do this on both sides so that the sway bar is free to rotate up and out of the way of the lower control arm.

8. With the wheel and tire removed from the vehicle again, take a look at the body mount and firewall area of the wheel well. You are going to make cuts into the plastic fender liner and body mount roughly as indicated in the image below. I use a simple angle grinder with a 5” metal cut off wheel for the body mount. For the plastic liner, you can cut it using a box knife. When making the cut in the plastic fender liner, be sure to ONLY cut the plastic at this time. You are not making a cut into the metal behind it yet.

Using a 19mm socket, remove the bolt attaching the sway bar end link to the lower control arm. Do this on both sides so that the sway bar is free to rotate up and out of the way of the lower control arm.

9. Once the plastic liner is cut, it will reveal the pinch weld seam, which is the flange that sticks out perpendicular from the firewall. Cut the pinch weld down to the point where its flush with the firewall around it. The body mount after trimming is also shown below.

Using a 19mm socket, remove the bolt attaching the sway bar end link to the lower control arm. Do this on both sides so that the sway bar is free to rotate up and out of the way of the lower control arm.

10. Seeing as this is the most critical part of this whole procedure, I have included 2 more close up photos of the body mount and pinch weld on the passenger side after making the cuts.

Using a 19mm socket, remove the bolt attaching the sway bar end link to the lower control arm. Do this on both sides so that the sway bar is free to rotate up and out of the way of the lower control arm.

11. Now that the pinch weld seam has been cut, it does run the risk of splitting apart over time. Not everyone does this, but I always recommend placing tack welds all along the cut pinch weld seam to glue it back together and avoid the chance of it splitting over time. The factory sheet metal here is very thin, so be sure that your welder is on the appropriate settings to weld it without instantly burning through. Even still, take your time and use lots of small, quick tack welds. After tack welding, grind the tacks down so it’s a nice smooth edge again.

Using a 19mm socket, remove the bolt attaching the sway bar end link to the lower control arm. Do this on both sides so that the sway bar is free to rotate up and out of the way of the lower control arm.

12. Its now time to weld in the cab mount plate. In order to clear my 37’s, I tucked that plate as far into the body mount bracket as possible. Our plate is the only one on the market that is notched out so it can fit a little tighter around the body mount bolt and nut for additional tire clearance. Be sure to just tack weld the plate in position and then test fit the tire for clearance. This way, you can easily cut it out again and make adjustments as needed. Once the tire fully clears your body mount plate, you may finish welding it in.

Using a 19mm socket, remove the bolt attaching the sway bar end link to the lower control arm. Do this on both sides so that the sway bar is free to rotate up and out of the way of the lower control arm.

13. At this point, your body mount patch plate and pinch weld seam should be all welded up and your tires should not be rubbing anything in this area. If your tires are still rubbing in this area at full compression lock to lock steering, repeat the previous steps until all rubbing is taken care of. Its now time to seal the exposed metal areas to prevent rusting.

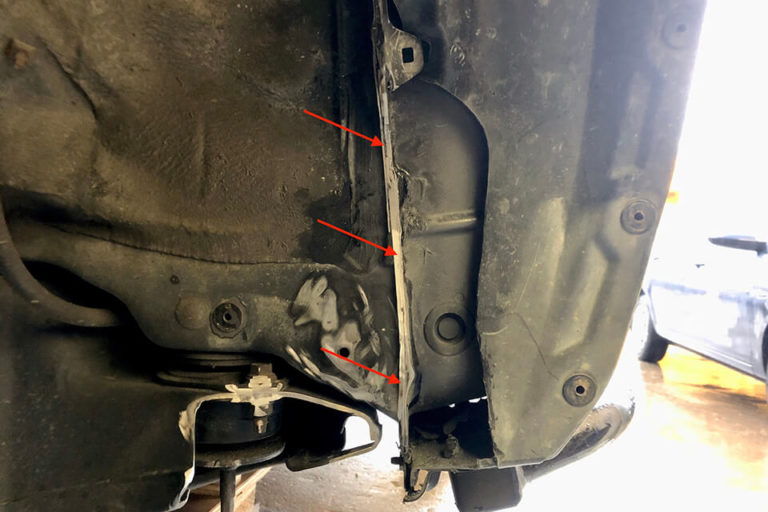
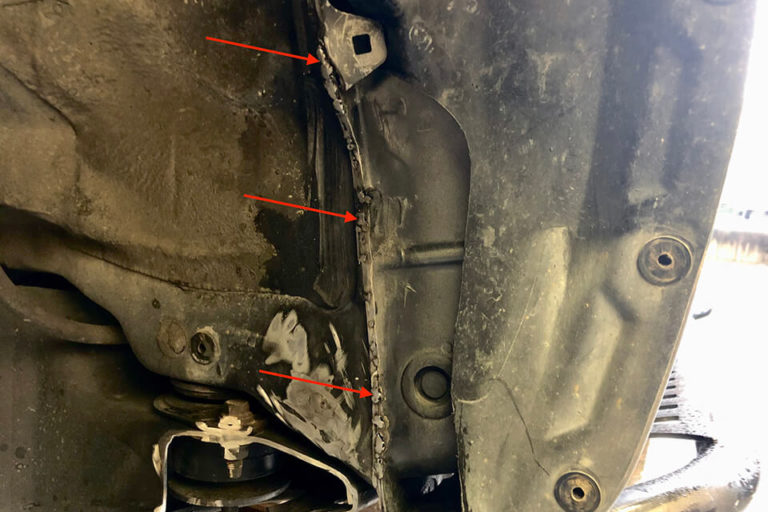
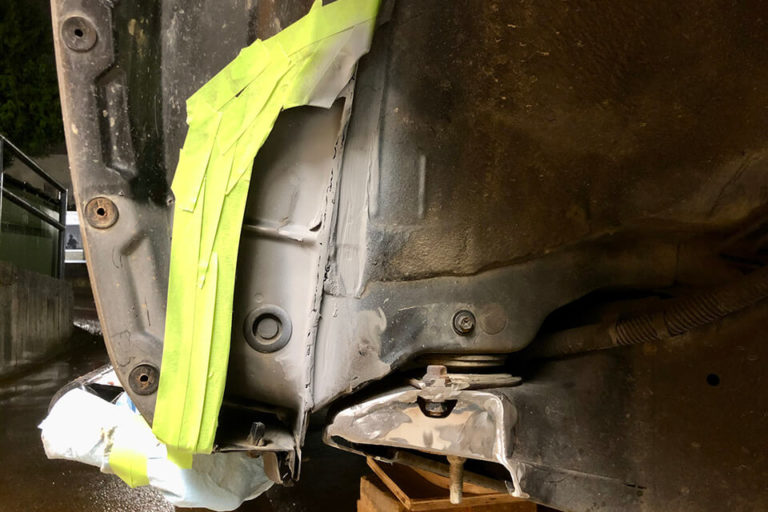
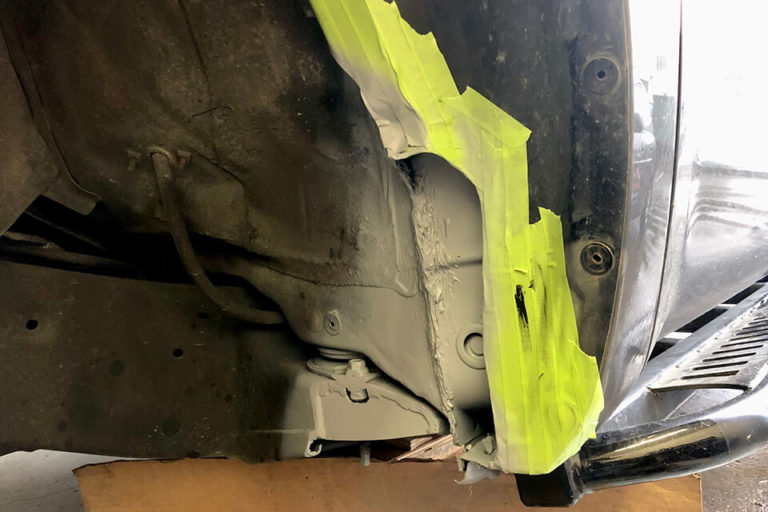
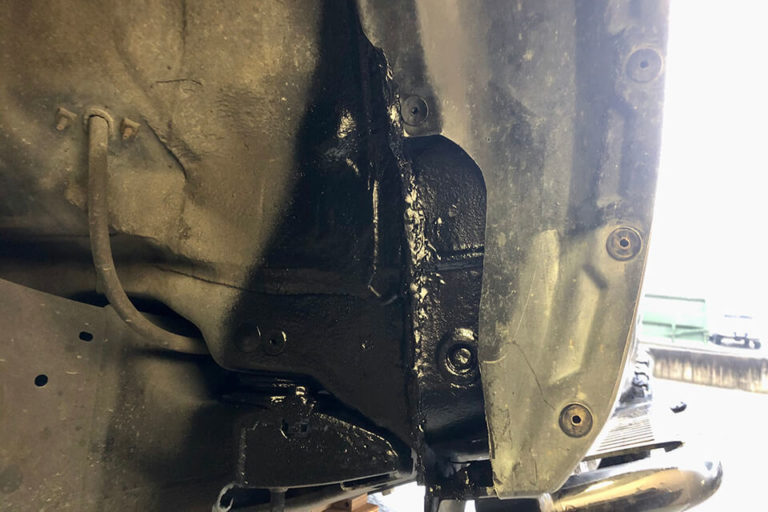
14. First, spray a bit of primer on the pinch weld seam area that you previously cut, tacked and sanded down. This will protect any small exposed pin holes or tight areas where the sealant may not flow fully. Next, apply the polyurethane sealant to the pinch weld seam cut. Apply this sealant liberally to the area all around the pinch weld seam cut.

Using a 19mm socket, remove the bolt attaching the sway bar end link to the lower control arm. Do this on both sides so that the sway bar is free to rotate up and out of the way of the lower control arm.

15. Once the sealant is dry, apply primer to all exposed metal areas, including the pinch weld seam and body mount.

Using a 19mm socket, remove the bolt attaching the sway bar end link to the lower control arm. Do this on both sides so that the sway bar is free to rotate up and out of the way of the lower control arm.

16. Finally, apply rubberized automotive undercoating to the area.

Now moving to the front of the wheel well for a quick modification, you will likely have a little bit of rub going on between the tire and the front edge of the wheel well liner as shown below.

17. Now moving to the front of the wheel well for a quick modification, you will likely have a little bit of rub going on between the tire and the front edge of the wheel well liner as shown below.

Now moving to the front of the wheel well for a quick modification, you will likely have a little bit of rub going on between the tire and the front edge of the wheel well liner as shown below.

18. Fixing this rubbing is very easy. The fender liner is secured here using the plastic clip and thin metal support bracket indicated by the red arrow below. Simply hammer or bend this thin metal bracket back as needed to suck the plastic fender liner forwards enough to clear the tire.

Now moving to the front of the wheel well for a quick modification, you will likely have a little bit of rub going on between the tire and the front edge of the wheel well liner as shown below.

Bumpstop spacers (Optional but Recommended)

Now I know what you’re thinking, but first let me explain! Bumpstop spacers are spacers that you add between your suspension bumpstops and the vehicle frame. These spacers lower your bumpstops so that your suspension will bottom out sooner. Yes, this means reduced overall suspension travel and this is why some people will laugh at me for even suggesting them. Normally, I am also against limiting suspension travel for the sake of reduced tire rub and this whole article is based around clearing big tires throughout the suspension’s entire travel range. HOWEVER, in the case of running 37” tires on the tundra, I am making an exception by adding some tiny bump stop spacers and here is why:

With a 37” tire jacked up to full compression using the method given in this article, the tire will not hit the top of the fender but it will be within a couple millimeters of it. Remember that ‘small caveat’ I mentioned earlier on? When you are out in the wilderness and encounter a hard suspension bottom-out situation, such as bumping a ledge obstacle to get up it or hitting an unexpectedly big dip on an FSR a little too fast, the suspension will compress (just as we simulated in the shop). Plus, there will also be flex in the vehicle chassis, body mounts, suspension bushings, etc that will result in the tires compressing a little bit further than what we can replicate in the shop. For this reason, its important to ensure that we give the tires at least an extra ½” of space to account for the additional flex and movement that will occur within the vehicle during a hard bottom out. My solution is to add a 3/16” thick front bumpstop spacer and a ¼” thick rear bumpstop spacer. Due to the relationships between the suspension pivot points, bumpstop locations, and tire location, this will result in a wheel travel reduction of just about ½” which is perfect. 

So yes, you will theoretically lose ½” of wheel travel, but this is wheel travel at the very end of the travel range that will only be reached during hard bottom-out situations. If you’d prefer to avoid the bumpstop spacers, the alternative is to cut and re-seal the vehicle’s outer fenders and remove the inner fender liners altogether. This adds a lot of work to the overall procedure, as well as visible cutting and modifications to the vehicle’s outer fenders that risks premature rusting if not sealed properly. If I was running an expensive long travel setup, I absolutely would do this. However, if you are running stock lower control arms with a typical lift or “mid travel” kit, you’re not losing any real suspension performance by limiting that last ½” of fender-crunching wheel travel.

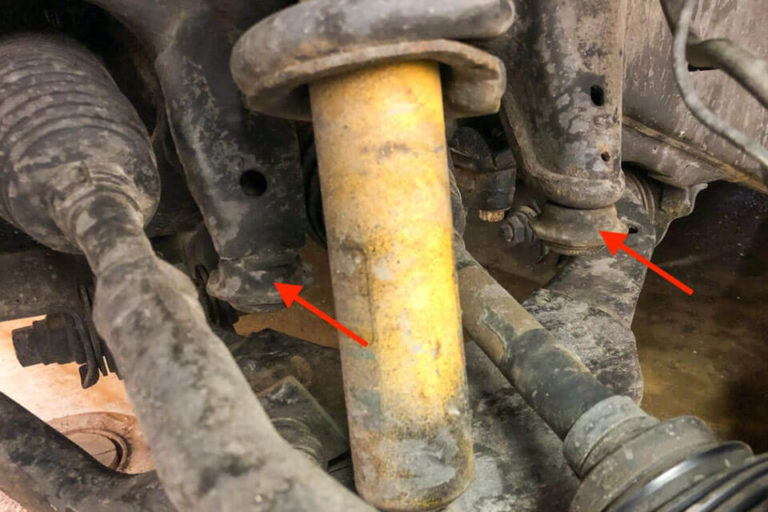
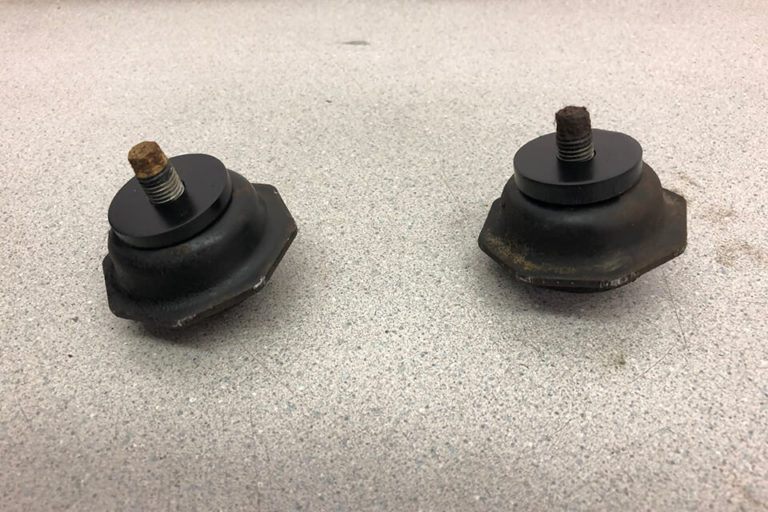
19. To install the bumpstop spacers, first remove the 2 bumpstop spacers using your pipe wrench opened up to 2.25” wide. Be sure to keep track of which bumpstop is the front and which one is the rear.

CLEARING 37” TIRES ON A TOYOTA TUNDRA AT ANY RIDE HEIGHT

20. Slide the thinner 3/16” bumpstop spacer over the front bumpstop and slide the thicker ¼” spacer over the rear bumpstop.

Now moving to the front of the wheel well for a quick modification, you will likely have a little bit of rub going on between the tire and the front edge of the wheel well liner as shown below.

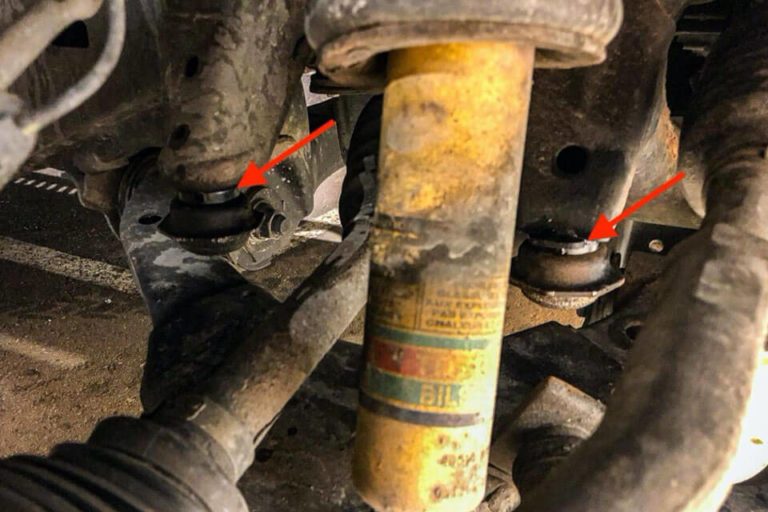
21. Reinstall the bumpstops back onto the vehicle. You can see in the picture below that the bumpstop spacers are now sitting between the bottom of the frame and the top of the bumpstop spacers.

CLEARING 37” TIRES ON A TOYOTA TUNDRA AT ANY RIDE HEIGHT

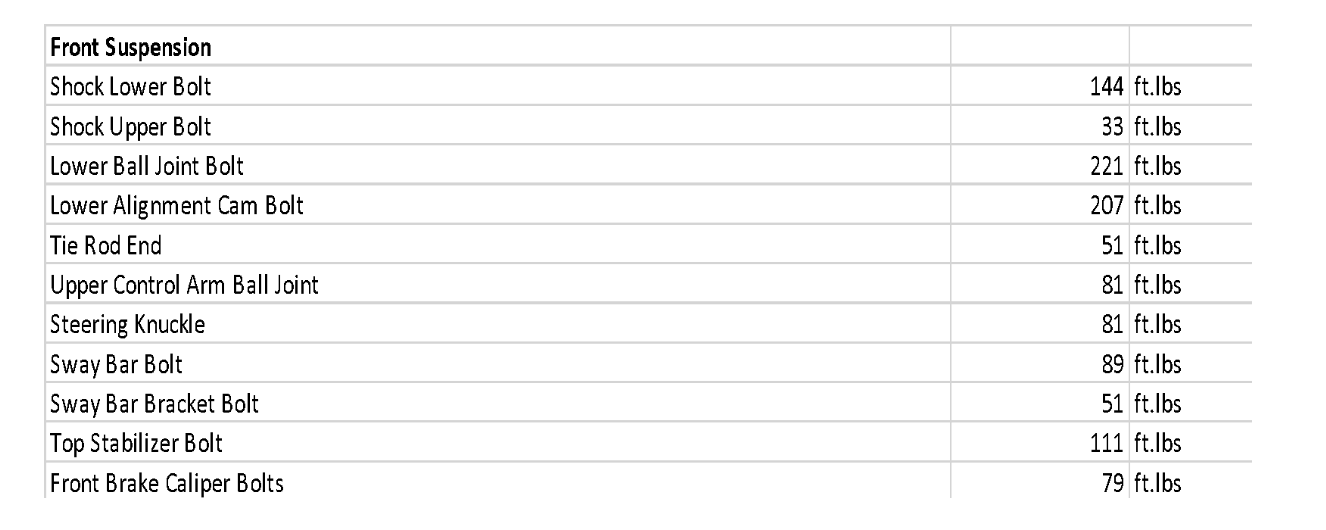
22. You may now reinstall all of the front suspension components that you removed at the start of this procedure. I have included a table with all of the common front suspension torque specs for the Tundra. These are the torque specs that I use, but always refer to Toyota’s official service manuals to verify. Be sure to re-check all bolt torques periodically. 
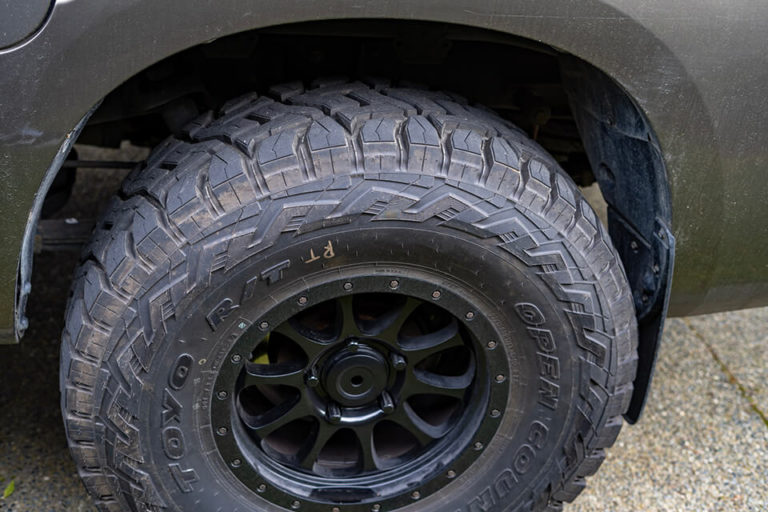
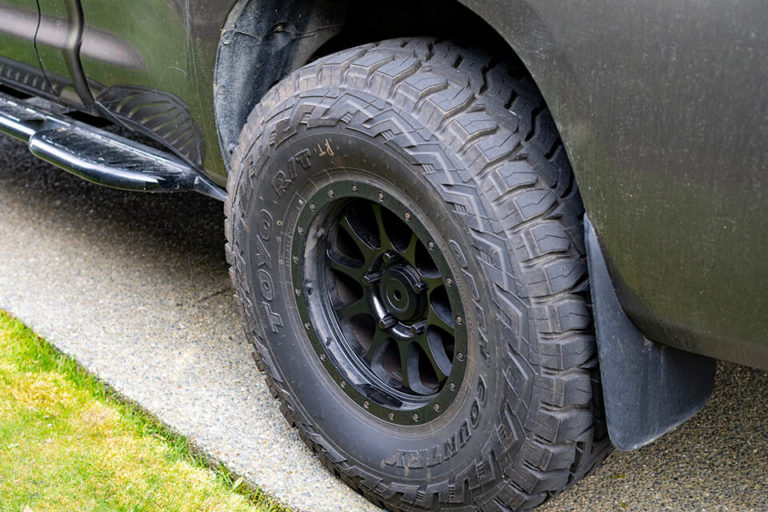
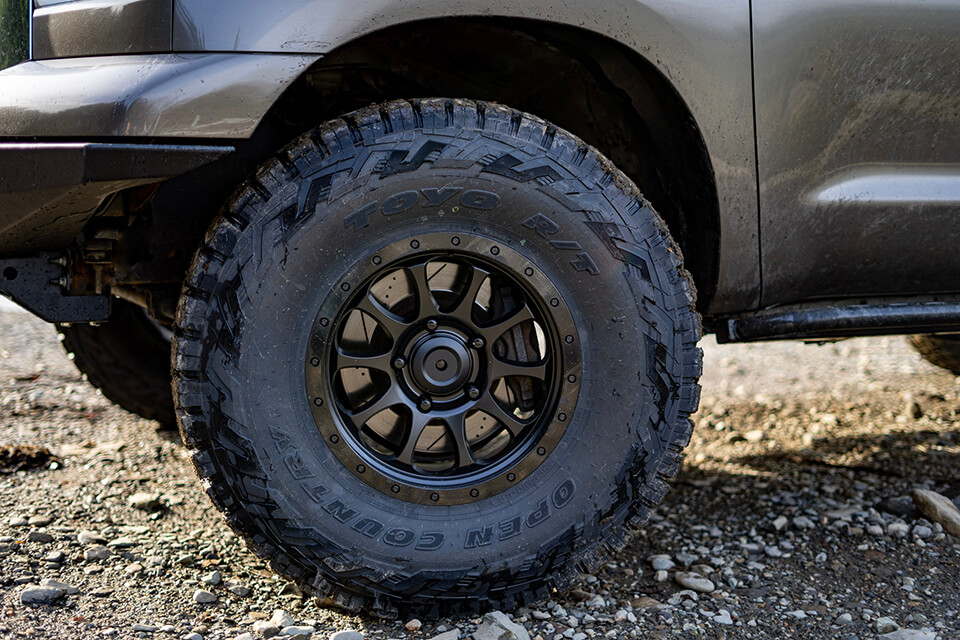
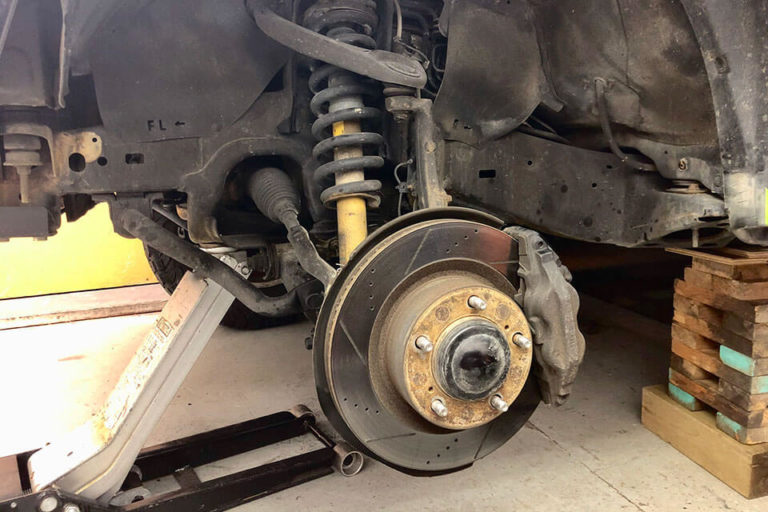
Now moving to the front of the wheel well for a quick modification, you will likely have a little bit of rub going on between the tire and the front edge of the wheel well liner as shown below.

23. Reinstall your new wheels and tires for the final time. Torque your lug nuts to 97 ft.lbs for aluminum wheels or 154ft.lbs for steel wheels. If you have aftermarket wheels, verify the correct torque with the wheel manufacturer.

Clearancing for the Rear Tires

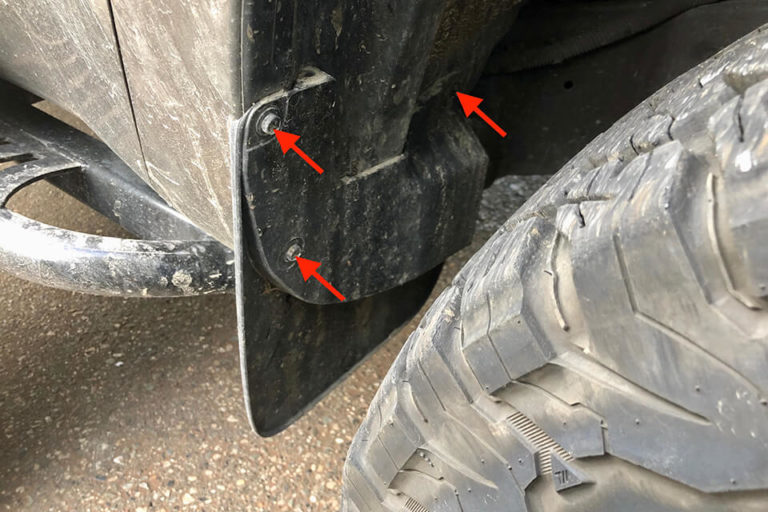
Unlike the front, fitment of 37” tires in the rear of the vehicle requires little to no work. A critical part in achieving this is again the wheel offset. With my +15 offset on these wheels, the tires will tuck under the outer fender during suspension articulation. With a 0 offset wheel, this will not be the case and you will need to trim the outer fender to eliminate that rubbing. The truck pictured in this article still has stock leaf springs and shocks with airbags added for carrying additional weight in the bed. If you are running aftermarket leaf springs and shocks that give you more articulation, the more extreme axle angles will cause your 37” tires to rub on the inner fender liners. To eliminate this rubbing, you can push the fender liners back as needed or remove them altogether.

Now moving to the front of the wheel well for a quick modification, you will likely have a little bit of rub going on between the tire and the front edge of the wheel well liner as shown below.

24. Now go enjoy your new, rub-free tire fitment. I hope you found this article informative. I would love to hear your comments below and be sure to send us some photos of your truck on 37’s!

Now moving to the front of the wheel well for a quick modification, you will likely have a little bit of rub going on between the tire and the front edge of the wheel well liner as shown below.

Share this post

Leave a Reply

Your email address will not be published. Required fields are marked *

Subscribe to our news

Don’t miss out on the latest 4WD trends with Coastal Offroad!